A Beginner's Guide to Building Your Own PC
Learn the essentials of building your own PC with this beginner's guide, covering components, assembly, and tips for success.
Understanding the Basics
Building your own PC might seem daunting, but understanding the basic components can simplify the process. At its core, a computer is a combination of hardware that works together to execute tasks. The essential components include the central processing unit (CPU), motherboard, memory (RAM), storage (like SSDs or HDDs), power supply unit (PSU), graphics processing unit (GPU), and a case to house everything. Each component has a specific role; for example, the CPU acts as the brain, while the GPU handles graphics rendering. Before diving into building, familiarize yourself with these parts and their functions. This foundational knowledge will help you make informed decisions when selecting components that meet your performance needs and budget constraints.
Choosing the Right Components
Selecting the right components for your custom PC build is crucial. Start by determining your primary use case: gaming, content creation, or general use. This will guide your choices, particularly for the CPU and GPU. For gaming, a powerful GPU is essential, while content creators might prioritize a strong CPU and ample RAM. Compatibility is key, so ensure that your chosen components work well together, particularly the CPU and motherboard. It's also important to consider future-proofing; investing in slightly better components now can save you from frequent upgrades later. Don't forget to check the form factor of your motherboard and case to ensure they match. Finally, balance your budget across all components to avoid bottlenecks, where one part limits the performance of others.
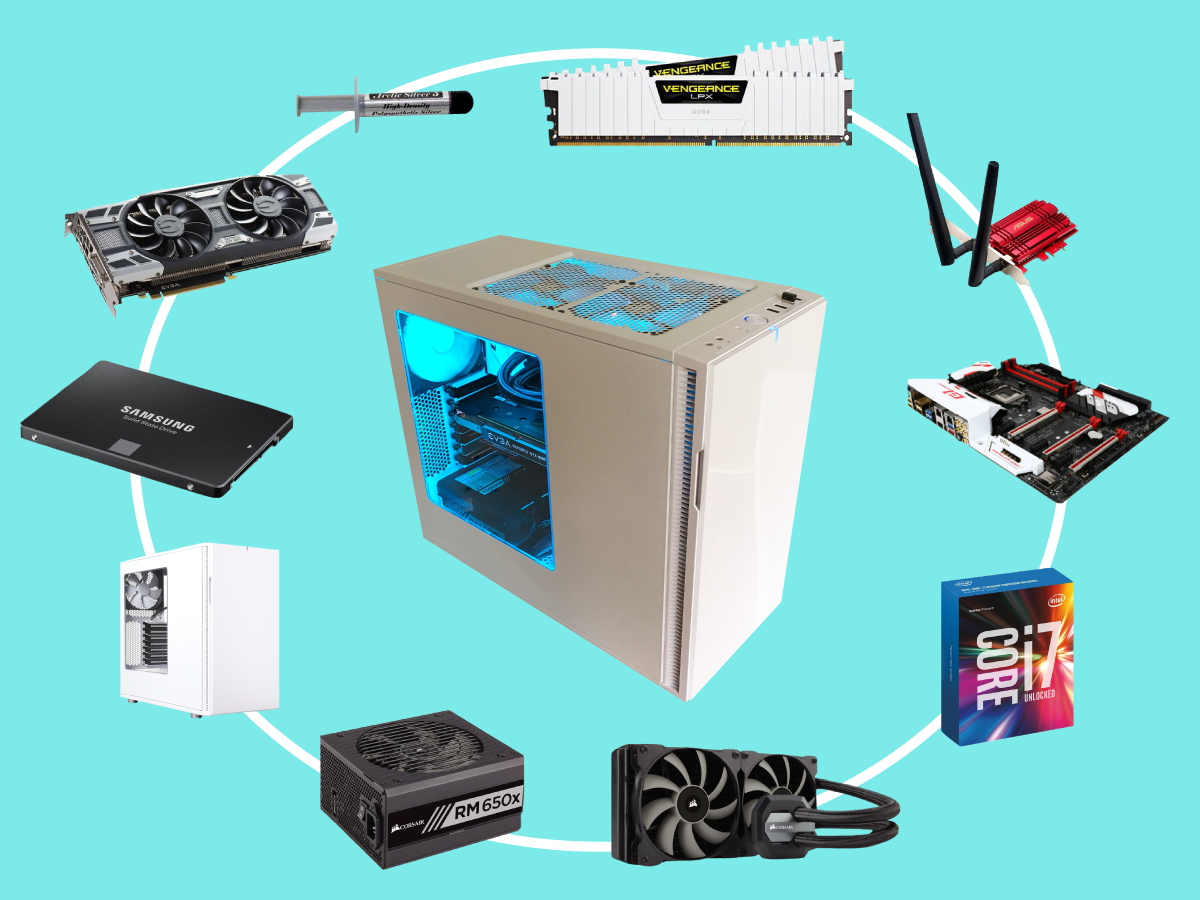
Assembling the Hardware
Once you've acquired all the necessary components, it's time to assemble your PC. Start by preparing your workspace with enough room and proper lighting. Begin with the motherboard; carefully insert the CPU and apply thermal paste before attaching the CPU cooler. Next, install the RAM into the appropriate slots, ensuring they click into place. Mount the motherboard into the case, securing it with screws. Insert your storage drives and connect them to the motherboard. The GPU should be installed into the PCIe slot, and additional power cables connected as needed. Lastly, install the PSU and connect all power cables to their respective components. Double-check all connections to ensure everything is secure. Remember, patience and attention to detail are key to a successful build.
Installing the Operating System
With the hardware assembled, the next step is to install the operating system (OS). Most builders opt for a Windows or Linux OS, depending on personal preference and software requirements. To begin, create a bootable USB drive with the OS installer. Insert the USB into your new PC and power it on. Enter the BIOS by pressing the designated key during startup, usually displayed on the screen. Set the USB drive as the primary boot device and save changes. The PC will restart, and the OS installation process will begin. Follow the on-screen instructions to complete the setup, including partitioning your storage drive and configuring initial settings. Once installed, your PC will be ready for use, and you can proceed with installing necessary drivers and software.
Optimizing Performance
After setting up your operating system, it's time to optimize your PC's performance. Begin by installing the latest drivers for your GPU, motherboard, and other components. These updates ensure compatibility and enhance performance. Consider overclocking your CPU or GPU if you're comfortable with advanced settings, but ensure adequate cooling is in place to prevent overheating. Regularly update your OS and software to benefit from security patches and new features. Clean your system regularly to remove dust and improve airflow, which can enhance cooling efficiency. Additionally, manage startup programs to reduce boot time and ensure your PC runs smoothly. By maintaining your system, you'll enjoy optimal performance and longevity.
Troubleshooting Common Issues
Even with careful assembly, you may encounter common issues with your new PC. If your system doesn't power on, double-check all power connections and ensure the PSU switch is on. For display issues, verify that the GPU is properly seated and the monitor is connected to the correct output. If the system is unstable or crashes, consider running diagnostic tools to check for faulty hardware, such as RAM or storage drives. Ensure all drivers are up to date, as outdated software can cause compatibility issues. If problems persist, consult online forums or seek advice from experienced builders. Patience and persistence are key when troubleshooting, and most issues can be resolved with careful analysis.
Enjoying Your Custom Build
Congratulations on building your own PC! Now it's time to enjoy the fruits of your labor. A custom-built PC not only offers performance tailored to your needs but also provides a sense of accomplishment. Whether you're gaming, editing videos, or simply browsing the web, your PC is ready to deliver a seamless experience. Take pride in the fact that you have constructed a machine that reflects your preferences and meets your specific requirements. Share your build with friends or online communities, and don't hesitate to help others who are embarking on their own PC-building journeys. Remember, building a PC is not just about assembling hardware; it's about crafting a tool that enhances your digital life.